Easy Chia Seed Jam Recipe – Quick & Healthy Homemade Fruit Spread
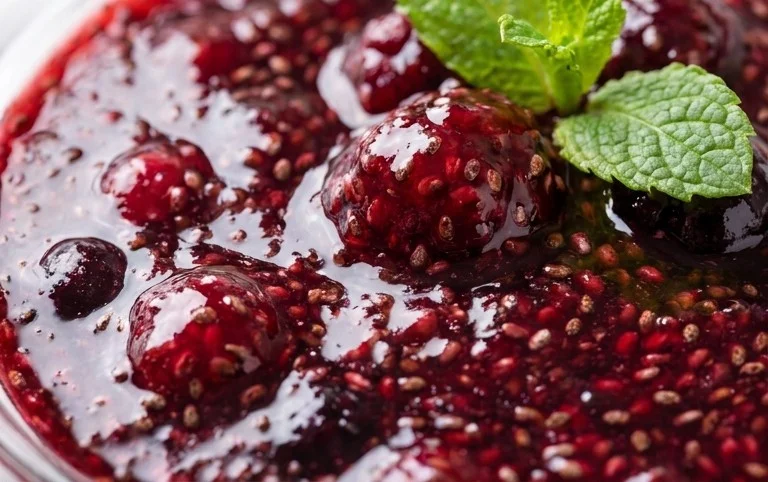
How to Make Chia Seed Jam is about to revolutionize your breakfast routine! Forget those store-bought jars laden with refined sugars and unfamiliar ingredients. We’re diving into the wonderfully simple, incredibly healthy world of homemade chia seed jam. If you’ve ever craved a vibrant, fruit-forward spread that’s not only delicious but also packed with goodness, you’re in the right place. What makes chia seed jam so special? It’s the magic of chia seeds themselves. These tiny powerhouses swell in liquid, transforming your favorite fruits into a perfectly set, naturally thick jam with absolutely no pectin or lengthy simmering required. Imagine spreading a ruby-red raspberry or a sun-kissed strawberry creation on your toast, knowing you’ve made it yourself with pure, wholesome ingredients. It’s a game-changer for health-conscious eaters, busy families, and anyone who appreciates the joy of truly homemade goodness. Get ready to discover how incredibly easy it is to whip up your own batch of this delightful chia seed jam!

How to Make Chia Seed Jam
Who doesn’t love jam? The sweet, fruity spread is a breakfast staple, a delightful addition to toast, yogurt, and even baked goods. But traditional jam can be loaded with sugar and often requires a lot of cooking and pectin. What if I told you there’s a way to make a delicious, vibrant jam with just a few simple ingredients, minimal cooking, and a healthy boost from superfood chia seeds? That’s right, we’re talking about chia seed jam! This recipe is incredibly easy, adaptable, and a fantastic way to enjoy the pure flavor of fruit without the fuss. It’s also a great option for those looking for a healthier alternative to store-bought jams. The chia seeds not only thicken the jam beautifully but also add fiber, protein, and omega-3 fatty acids. Let’s dive in and create some magic!
Ingredients:
- 3 cups Fresh Berries of choice*
- ¼ cup Filtered Water
- 1 tbsp Maple Syrup*
- 2-3 tbsp Chia Seeds*
- Juice of 1/2 Lemon
*Note: You can use any berries you like – strawberries, blueberries, raspberries, blackberries, or a mix! For the maple syrup, you can adjust the sweetness to your preference. If you prefer a less sweet jam, start with less and add more to taste. The amount of chia seeds can also be slightly adjusted depending on how thick you like your jam.
The Simple Process: Bringing It All Together
Making chia seed jam is a wonderfully straightforward process. It’s so simple that even beginner cooks can master it in minutes. The key is allowing the chia seeds to work their magic and thicken the fruit mixture. We’ll be gently cooking the fruit to release its juices and then letting the chia seeds do the rest.
Step 1: Prepare Your Fruit
Start by rinsing your chosen berries thoroughly. If you’re using larger fruits like strawberries, it’s a good idea to hull them and then roughly chop them into smaller pieces. This will help them break down more easily during the cooking process and create a smoother jam. For smaller berries like blueberries or raspberries, no chopping is necessary. The goal here is to get them ready to release their delicious juices.
Step 2: Gentle Cooking to Release Flavors
In a medium saucepan, combine your prepared berries with the ¼ cup of filtered water. Place the saucepan over medium heat. You want to bring the mixture to a gentle simmer, not a rolling boil. Stir occasionally to prevent sticking. As the berries heat up, you’ll notice them starting to soften and release their vibrant juices. This process usually takes about 5-7 minutes. You can gently mash some of the berries with the back of your spoon if you want a smoother consistency from the start. This gentle cooking helps to break down the fruit and makes it easier for the chia seeds to absorb the liquid and thicken the jam.
Step 3: Sweetening and Brightening
Once the berries have softened and released a good amount of juice, remove the saucepan from the heat. Now it’s time to add the flavor enhancers. Stir in the 1 tablespoon of maple syrup. This adds a touch of sweetness and enhances the natural fruit flavor. Next, add the juice of ½ a lemon. The lemon juice is crucial! It not only adds a lovely brightness and tang that cuts through the sweetness but also helps to preserve the jam and activate the gelling properties of the chia seeds. Give it a good stir to ensure everything is well incorporated.
Step 4: The Magical Thickening with Chia Seeds
This is where the chia seeds come into play. Sprinkle the 2-3 tablespoons of chia seeds evenly over the warm fruit mixture. Whisk vigorously for about 30 seconds to ensure there are no clumps of chia seeds. The seeds will start to absorb the liquid almost immediately, but they need a little time to fully work their thickening magic. Once whisked in, let the mixture sit at room temperature for about 10-15 minutes. During this time, you’ll see the jam begin to thicken noticeably as the chia seeds plump up and create a gel-like consistency.
Step 5: The Final Set and Storage
After the initial 10-15 minute rest, give the jam another good stir. If you find it’s not as thick as you’d like, you can let it sit for another 5-10 minutes. The jam will continue to thicken as it cools further. Once you’re happy with the consistency, carefully spoon the chia seed jam into a clean, airtight jar or container. Allow the jam to cool completely at room temperature before sealing the jar and transferring it to the refrigerator. The chia seed jam will thicken even more as it chills in the fridge. It’s best to let it set for at least an hour or two before enjoying it. This allows the chia seeds to fully hydrate and create that perfect jam texture.
Enjoy your homemade, healthy, and absolutely delicious chia seed jam! It will keep in the refrigerator for about 1-2 weeks.
Conclusion:
Making your own chia seed jam is a wonderfully simple and rewarding way to enjoy a healthier, fruit-forward spread. This recipe is fantastic because it bypasses the high sugar content and pectin of traditional jams, relying on the natural gelling power of chia seeds to create a thick, delicious consistency. It’s also incredibly versatile, allowing you to use your favorite fresh or frozen fruits. We’ve seen how easy it is to whip up a batch, proving that delicious and nutritious can go hand-in-hand.
Beyond the standard toast topping, get creative with your chia seed jam! It’s perfect swirled into yogurt or oatmeal, as a filling for baked goods like muffins or scones, or even as a glaze for roasted meats. Don’t be afraid to experiment with different fruit combinations – berries, peaches, apricots, or even mangoes all work beautifully. Feel encouraged to dive in and try this easy method; you might just find yourself making it a regular staple in your kitchen!
Frequently Asked Questions:
How long does chia seed jam last?
Properly stored in an airtight container in the refrigerator, your homemade chia seed jam should last for about 1 to 2 weeks. The chia seeds help preserve it to some extent, but it doesn’t have the same shelf stability as store-bought, high-sugar versions.
Can I make chia seed jam with frozen fruit?
Absolutely! Frozen fruit is an excellent choice for chia seed jam, especially if fresh fruit is out of season or too expensive. Simply thaw the frozen fruit slightly before mashing or blending it, then proceed with the recipe as usual. You may need to adjust the cooking time slightly depending on how much liquid is released from the thawing fruit.
What if my jam isn’t thick enough?
If your chia seed jam is thinner than you’d like, don’t worry! You can usually thicken it by adding more chia seeds, about 1 teaspoon at a time, stirring well, and letting it sit for another 15-30 minutes to allow the seeds to absorb more liquid. You can also gently heat the jam again for a few minutes while stirring, which can sometimes help the chia seeds work their magic.
How to Make Chia Seed Jam
A quick and easy recipe for homemade chia seed jam using fresh berries.
Ingredients
-
3 cups Fresh Berries of choice*
-
1/4 cup Filtered Water
-
1 tbsp Maple Syrup*
-
2-3 tbsp Chia Seeds*
-
Juice of 1/2 Lemon
Instructions
-
Step 1
Combine fresh berries of choice and filtered water in a medium saucepan. -
Step 2
Cook over medium heat, stirring occasionally, until the berries break down and release their juices, about 5 minutes. -
Step 3
Remove from heat and mash the berries with a fork or potato masher until you reach your desired consistency. For a smoother jam, use an immersion blender. -
Step 4
Stir in maple syrup and the juice of 1/2 lemon. -
Step 5
Gradually whisk in the chia seeds, 1 tablespoon at a time, until well combined. Let sit for 5-10 minutes for the jam to thicken. -
Step 6
Once thickened to your liking, transfer the jam to a clean jar and store in the refrigerator. It will continue to thicken as it cools.
Important Information
Nutrition Facts (Per Serving)
It is important to consider this information as approximate and not to use it as definitive health advice.
Allergy Information
Please check ingredients for potential allergens and consult a health professional if in doubt.