Easy Mini Pumpkin Pies Perfect Fall Treat
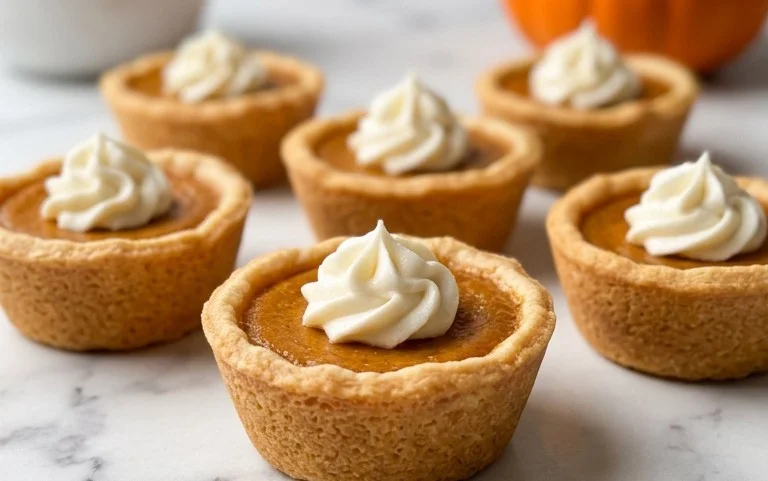
Mini Pumpkin Pies are more than just a dessert; they’re bite-sized bursts of autumn magic. There’s something undeniably comforting about the warm spices, the creamy pumpkin filling, and that flaky, buttery crust, isn’t there? These little delights capture all the essence of traditional pumpkin pie, but in a perfectly portioned package that makes them irresistible. We love them because they eliminate the need for slicing and serving, making them ideal for gatherings, potlucks, or even just a cozy evening in. What truly makes these mini pumpkin pies so special is their adorable presentation and the sheer joy they bring with every single bite. They’re the perfect way to indulge in your favorite fall flavors without any of the fuss, offering a delightful sweetness that’s sure to bring smiles all around.
Get Ready to Bake!
Your new favorite fall treat awaits.
Mini Pumpkin Pies
There’s something undeniably comforting about pumpkin pie. The warm spices, the creamy filling, the flaky crust – it’s a quintessential taste of autumn. But sometimes, a whole pie feels like a commitment, or perhaps you just crave that perfect, individual portion of pumpkiny goodness. That’s where these delightful mini pumpkin pies come in! They are incredibly easy to make, perfect for portion control (or for indulging without guilt!), and bake up beautifully. Whether you’re hosting a fall gathering, bringing a treat to a potluck, or simply want a sweet afternoon pick-me-up, these mini pies are sure to be a hit. We’ll be using a few simple ingredients and a straightforward method to create these adorable desserts. Get ready to fill your kitchen with the most wonderful autumnal aroma!
Ingredients:
- 2 9-inch refrigerated rolled pie crusts (homemade or store bought)
- 1/3 cup brown sugar
- 2 tablespoons granulated sugar
- 1 1/2 teaspoons pumpkin pie spice
- 1/4 teaspoon salt
- 1 cup canned pumpkin puree ( (not pumpkin pie filling))
- 3/4 cup evaporated milk
- 1 large egg
- 1/2 teaspoon vanilla extract
- Homemade whipped cream (for topping)
Instructions:
-
Preparing the Crusts and Preheating the Oven
The first step to our mini pumpkin pie adventure is to get our crusts ready. Since we’re making mini pies, we need to cut out circles from our 9-inch pie crusts that will fit into our muffin tin cups. I like to use a large round cookie cutter or even a glass with a diameter of about 3-4 inches. Place the rolled-out pie crusts on a lightly floured surface and press down firmly with your chosen cutter. You should aim to get about 12-16 circles, depending on the size of your cutter and how you arrange them. Gently press each circle into the cups of a standard 12-cup muffin tin, creating a little cup for our filling. Don’t worry if they aren’t perfectly shaped; the filling will hold them. Once your muffin tin is lined with the crusts, pop it into the freezer for about 15-20 minutes. This helps the crusts hold their shape during baking and prevents them from shrinking too much. While the crusts are chilling, go ahead and preheat your oven to 375°F (190°C). Having the oven at the right temperature is crucial for even baking.
-
Mixing the Pumpkin Filling
Now for the star of the show: the pumpkin filling! In a medium-sized bowl, combine the brown sugar, granulated sugar, pumpkin pie spice, and salt. Whisk these dry ingredients together to ensure the spices and sugars are evenly distributed. This step is important for a consistent flavor throughout your pies. Next, add the canned pumpkin puree. Make sure you are using pure pumpkin puree and NOT pumpkin pie filling, as the latter already contains sugar and spices, which would alter the taste and texture of our recipe. Stir the pumpkin puree into the sugar and spice mixture until it’s well combined. In a separate small bowl, lightly whisk the large egg. Then, whisk in the evaporated milk and the vanilla extract. Evaporated milk gives our filling a wonderfully rich and creamy texture, and the vanilla adds a subtle, sweet aroma. Pour the wet ingredients into the pumpkin mixture and stir everything together until it’s smooth and homogenous. You should have a beautifully rich orange batter. Take care not to overmix, as this can sometimes lead to a tougher filling.
-
Filling the Pie Crusts
With our crusts chilled and our filling ready, it’s time to assemble these mini delights. Carefully remove the muffin tin from the freezer. Spoon the pumpkin filling evenly into each of the prepared pie crusts. I like to use an ice cream scoop or a measuring cup to ensure I’m adding a similar amount of filling to each cup. Don’t overfill them; leave a little room at the top, as the filling will puff up slightly during baking. You want the filling to come up to just below the rim of the crust. This also helps prevent any overflow, making for easier cleanup. Once all the crusts are filled, carefully place the muffin tin onto a baking sheet. This extra precaution will catch any potential drips or spills, further simplifying the cleanup process after baking.
-
Baking the Mini Pumpkin Pies
Now it’s time to bake our adorable mini pies! Place the baking sheet with the muffin tin into your preheated oven at 375°F (190°C). Bake for approximately 20-25 minutes. You’ll know they’re ready when the crusts are golden brown, and the filling is set. The filling will jiggle slightly in the center, but it should not be liquid. If you’re unsure, you can gently insert a toothpick into the center of one of the pies; it should come out clean. Keep an eye on them during the last few minutes of baking, as ovens can vary. If you notice the edges of the crusts are browning too quickly, you can loosely tent them with aluminum foil. Once they’re baked to perfection, carefully remove the muffin tin from the oven. Let them cool in the muffin tin for about 10-15 minutes before attempting to remove them. This allows them to firm up a bit more.
-
Cooling and Serving
After the initial cooling period in the muffin tin, gently loosen the edges of each mini pie with a knife or an offset spatula, then carefully lift them out of the tin and transfer them to a wire rack to cool completely. Allowing them to cool completely is key to achieving the best texture. While they are delicious served warm, they are even better at room temperature or slightly chilled, allowing the flavors to fully meld. Once cooled, these mini pumpkin pies are ready to be enjoyed! A dollop of homemade whipped cream is the perfect finishing touch, adding a light and airy contrast to the rich pumpkin filling. You can also dust them with a little extra cinnamon or nutmeg if you desire. These mini pies are perfect for individual desserts, party favors, or just a delightful treat to share. Store any leftovers in an airtight container in the refrigerator for up to 3 days. Enjoy every delightful bite of your homemade mini pumpkin pies!

Conclusion:
I hope you’re as excited as I am to try these adorable mini pumpkin pies! This recipe is a fantastic way to enjoy the classic flavors of fall in a perfectly portioned, charming package. They’re incredibly versatile, making them ideal for holiday gatherings, potlucks, or just a cozy afternoon treat. The ease of preparation, combined with their delightful presentation, truly makes them a winner.
For serving, these mini delights are wonderful on their own, but I personally love topping them with a dollop of freshly whipped cream or a sprinkle of cinnamon. They also pair beautifully with a warm cup of cider or coffee. If you’re looking for some fun variations, consider adding a pinch of nutmeg or ginger to the filling for an extra spice kick, or even a swirl of caramel sauce before baking. Don’t be afraid to get creative! I truly encourage you to give this recipe a try – it’s sure to become a favorite in your autumn baking repertoire.
Frequently Asked Questions:
Can I make these mini pumpkin pies ahead of time?
Absolutely! These mini pumpkin pies can be made a day in advance. Store them in an airtight container at room temperature for up to two days, or refrigerate them for up to four days. For the best texture, let them come to room temperature for about 30 minutes before serving if refrigerated.
What if I don’t have mini pie tins?
No problem at all! You can use a standard muffin tin. The baking time might be slightly shorter, so keep an eye on them. Alternatively, you can make a single larger pie using a standard pie crust, adjusting the baking time accordingly.
Mini Pumpkin Pies
Delightful mini pumpkin pies perfect for any autumn gathering.
Ingredients
-
2 9-inch refrigerated rolled pie crusts
-
1/3 cup brown sugar
-
2 tablespoons granulated sugar
-
1 1/2 teaspoons pumpkin pie spice
-
1/4 teaspoon salt
-
1 cup canned pumpkin puree
-
3/4 cup evaporated milk
-
1 large egg
-
1/2 teaspoon vanilla extract
-
Homemade whipped cream (for topping)
Instructions
-
Step 1
Preheat oven to 375°F (190°C). Unroll pie crusts and use a 3-4 inch round cutter or glass to cut out circles. Press the circles into a greased mini muffin tin to form crusts. -
Step 2
In a medium bowl, whisk together brown sugar, granulated sugar, pumpkin pie spice, and salt. -
Step 3
Stir in the canned pumpkin puree until well combined. -
Step 4
In a separate small bowl, whisk the egg and vanilla extract. Add this to the pumpkin mixture and stir until smooth. -
Step 5
Gradually whisk in the evaporated milk until the filling is smooth and fully incorporated. -
Step 6
Pour the pumpkin filling evenly into the prepared pie crusts in the mini muffin tin, filling each about two-thirds full. -
Step 7
Bake for 20-25 minutes, or until the centers are set and a knife inserted near the center comes out clean. The edges of the crust should be golden brown. -
Step 8
Let the mini pies cool in the muffin tin for about 10 minutes before carefully removing them to a wire rack to cool completely. -
Step 9
Serve chilled or at room temperature, topped with homemade whipped cream.
Important Information
Nutrition Facts (Per Serving)
It is important to consider this information as approximate and not to use it as definitive health advice.
Allergy Information
Please check ingredients for potential allergens and consult a health professional if in doubt.