Spooky Baked Halloween Chips-Easy Spooky Recipe
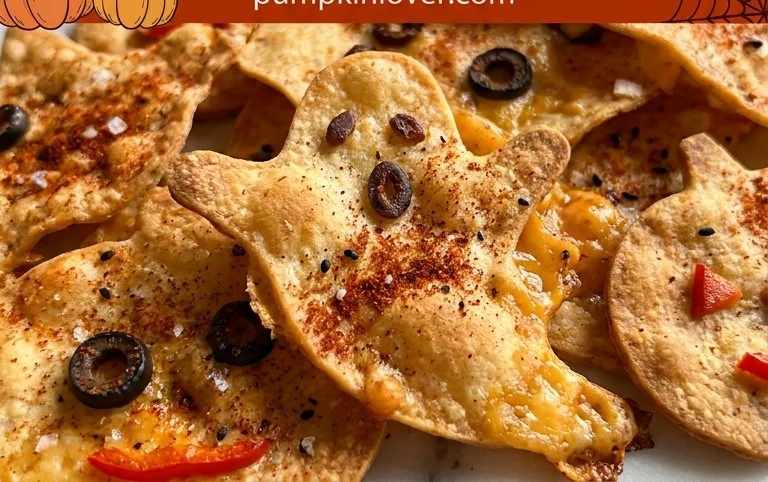
Spooky Baked Halloween Chips are here to haunt your taste buds this season! Forget the store-bought, sugar-laden treats that leave you feeling guilty. We’re talking about a wickedly delicious, surprisingly simple way to get your Halloween snack fix. Imagine a batch of perfectly crisp, seasoned chips, but with a delightful twist that screams “creepy, crawly, and oh-so-yummy!” These aren’t just any chips; they’re a canvas for your inner ghoulish artist, transforming humble potatoes into edible masterpieces. What makes these Spooky Baked Halloween Chips so special? It’s the blend of wholesome ingredients, the fun of crafting their festive shapes, and the sheer joy of sharing something homemade and utterly enchanting. They’re the perfect way to fuel your Halloween movie marathon, impress your trick-or-treaters, or simply indulge in a bit of spooky season magic. Get ready to embrace the delicious darkness!

Spooky Baked Halloween Chips
This Halloween, ditch the store-bought chips and impress your ghoulish guests with these incredibly easy and delightfully spooky baked Halloween chips! They’re not only fun to make but also incredibly versatile. Imagine little ghosts, pumpkins, and bats ready to be dipped into your favorite spooky salsa or a creamy guacamole. The best part? They’re baked, not fried, making them a slightly healthier alternative to traditional chips, and the crispiness is surprisingly addictive. Let’s get this Halloween baking party started!
Ingredients:
- 4 flour tortillas (gluten-free or grain-free, as needed)
- Spray avocado or olive oil
- Salt
- Halloween cookie cutter (various shapes like ghosts, pumpkins, bats, spiders are ideal)
Creating Your Spooky Shapes
The magic of these chips lies in their playful shapes. Before we even think about baking, let’s focus on transforming our tortillas. This is where the cookie cutters come into play. If you don’t have Halloween-specific cutters, don’t fret! Any fun shapes will do, but the more thematic, the spookier the final platter. Think about the size of your cutters; you want them to be substantial enough to be recognizable but not so large that they become unwieldy or don’t fit well on the tortilla.
Gather your four flour tortillas. If you’re using gluten-free or grain-free tortillas, be a little gentler as they can sometimes be more delicate. Lay one tortilla flat on a clean cutting board or a large, flat surface. Take your first Halloween cookie cutter and press it firmly into the tortilla. You might need to give it a little wiggle to ensure a clean cut. Repeat this process, moving the cutter around the tortilla, until you’ve used as much of the surface area as possible. Don’t worry about the scraps! We’ll address those in a moment. Continue this until all four tortillas have been cut into spooky shapes.
Preparing the Scraps
Now, what about those leftover tortilla pieces? They’re too good to waste! You can either cut them into smaller, more traditional chip shapes, like triangles or squares, or you can embrace the “monstrous” look and leave them as irregular pieces. If you want a mix of classic and spooky, cut some of your scraps into triangles. This way, you’ll have a variety of shapes for dipping. Arrange these scrap pieces on your baking sheets as well. The goal is to maximize our delicious, crispy chip production!
Baking the Spooktacular Chips
This is where our spooky shapes transform into crispy, golden delights. We’re going to bake these at a moderate temperature to ensure they get perfectly crisp without burning. Preheat your oven to 375°F (190°C). While the oven is heating up, it’s time to get our tortilla shapes ready for their transformation.
Line two large baking sheets with parchment paper. This will prevent the chips from sticking and make for easy cleanup. Carefully arrange your cut-out tortilla shapes and any scrap pieces on the prepared baking sheets. Try to give them a little bit of space between each shape so that they bake evenly and don’t steam. If you overcrowd the pan, you’ll end up with softer chips, and we’re aiming for crispness!
The Crucial Oiling and Salting Stage
This step is critical for achieving that delicious, savory flavor and a slight crispness even before baking. Take your spray avocado or olive oil. Lightly mist both sides of each tortilla shape. You don’t want to drench them; a light coating is all that’s needed. The oil helps the salt adhere and contributes to the crisping process in the oven. Following the oil spray, generously sprinkle salt over one side of all the shapes. You can adjust the amount of salt to your preference, but a good dusting is recommended for that classic chip flavor. If you’re feeling adventurous, you could also add other seasonings at this stage, like garlic powder or a pinch of chili powder for a little kick, but for classic spooky chips, salt is king.
The Baking Process – Turning Tortillas into Treats
Now, let’s get these spooky shapes into the oven! Place your prepared baking sheets into the preheated oven. We’ll bake them for about 7-10 minutes on the first side. Keep a close eye on them, especially as they get closer to the end of the baking time. Ovens can vary, and tortillas can go from perfectly golden to burnt very quickly. You’re looking for the edges to start turning golden brown.
Once the edges are showing signs of crisping, carefully remove the baking sheets from the oven. Using a spatula or tongs, gently flip each tortilla shape over. If you’ve cut your scraps into smaller pieces, you might need to flip them more frequently to ensure even crisping. Return the baking sheets to the oven and continue baking for another 5-8 minutes, or until the second side is also golden brown and the chips are crispy. The total baking time will depend on the thickness of your tortillas and your oven.
Cooling and Serving Your Spooky Creations
Once baked to perfection, remove the baking sheets from the oven. Let the spooky chips cool on the baking sheets for a few minutes. They will continue to crisp up as they cool. After they’ve cooled slightly, you can carefully transfer them to a wire rack to cool completely. This ensures that they don’t steam and lose their crispness. Once completely cool, your Spooky Baked Halloween Chips are ready to be served! Arrange them on a platter for your Halloween party, or simply enjoy them as a delicious and fun snack. They’re perfect for dipping in salsa, guacamole, cheese dip, or even a spooky caramel sauce for a sweet treat! These chips are best enjoyed fresh, but can be stored in an airtight container at room temperature for a day or two. Happy Halloween snacking!
Conclusion:
There you have it! These Spooky Baked Halloween Chips are an absolute winner for any Halloween gathering, or even just for a fun weeknight treat. They’re wonderfully crispy, surprisingly healthy thanks to the baking method, and endlessly customizable. We’ve discovered that making your own chips is not only a rewarding kitchen adventure but also a fantastic way to impress your guests with something homemade and utterly delicious. The satisfaction of pulling a tray of these golden beauties from the oven, knowing you’ve created a treat that’s both festive and satisfying, is truly special.
I love serving these alongside a variety of dips – a creamy guacamole, a zesty salsa, or even a spooky black bean dip are perfect pairings. For variations, don’t be afraid to experiment! Dust them with smoked paprika for an extra layer of smoky flavor, or try a pinch of cayenne for a little heat. You could even sprinkle on some finely grated Parmesan cheese before baking for a cheesy kick. I wholeheartedly encourage you to give this recipe a try. It’s simple, fun, and the results are simply spooktacular!
Frequently Asked Questions:
Q: Can I use different types of vegetables for these chips?
Absolutely! While potatoes are classic, you can easily substitute other root vegetables. Sweet potatoes, carrots, parsnips, and even thinly sliced zucchini or eggplant work wonderfully. Just adjust the baking time slightly as different vegetables have varying moisture content.
Q: How do I get my chips extra crispy?
Ensuring a single layer of chips on your baking sheet is key. Avoid overcrowding, as this will steam the chips instead of baking them to crispness. You can also use parchment paper for an even crispier bottom. If they aren’t as crisp as you’d like after the initial bake, you can pop them back in the oven for a few extra minutes, keeping a close eye to prevent burning.
Q: Can I make these chips ahead of time?
Baked chips are best enjoyed fresh, as they can lose some of their crispness over time. However, if you need to make them a few hours in advance, let them cool completely on a wire rack and then store them in an airtight container at room temperature. For longer storage, they can be stored for a day or two, but their texture will soften.
Spooky Baked Halloween Chips
Crispy, savory baked tortilla chips shaped like Halloween figures for a festive snack.
Ingredients
-
4 flour tortillas (gluten-free or grain-free, as needed)
-
Avocado oil spray
-
Salt
-
Water
-
Cornmeal
Instructions
-
Step 1
Preheat oven to 375°F (190°C). -
Step 2
Lightly spray both sides of the flour tortillas with avocado oil. -
Step 3
Sprinkle one side of each tortilla with salt and a light dusting of cornmeal. -
Step 4
Using Halloween cookie cutters, cut out shapes from the tortillas. You can re-roll scraps to cut more shapes. -
Step 5
Arrange the cut-out shapes in a single layer on a baking sheet. -
Step 6
Bake for 8-12 minutes, or until golden brown and crispy. Watch closely to prevent burning. -
Step 7
Let cool slightly before serving. You can also dip the cookie cutters in water and press onto the tortillas before spraying to help the cornmeal stick better.
Important Information
Nutrition Facts (Per Serving)
It is important to consider this information as approximate and not to use it as definitive health advice.
Allergy Information
Please check ingredients for potential allergens and consult a health professional if in doubt.