Grinch Sugar Cookies-Chewy Green Holiday Treats
Grinch Sugar Cookies are more than just a holiday treat; they’re a vibrant burst of festive cheer that can melt even the iciest heart. Imagine those iconic, slightly crooked smiles and vibrant green hues appearing on your countertop, instantly bringing a smile to your face. These aren’t your average, everyday sugar cookies. What truly makes these Grinch Sugar Cookies so special is their playful and whimsical nature. They capture the spirit of the beloved character, reminding us that even the grumpiest among us can find joy in the season. We all love them because they’re incredibly fun to make and even more fun to decorate, transforming a simple cookie into a miniature masterpiece. Whether you’re hosting a holiday party or just looking for a delightful way to spend an afternoon with loved ones, these cookies are guaranteed to be a showstopper. Get ready to embrace your inner Whoville and bake up some pure merriment!
Grinch Sugar Cookies
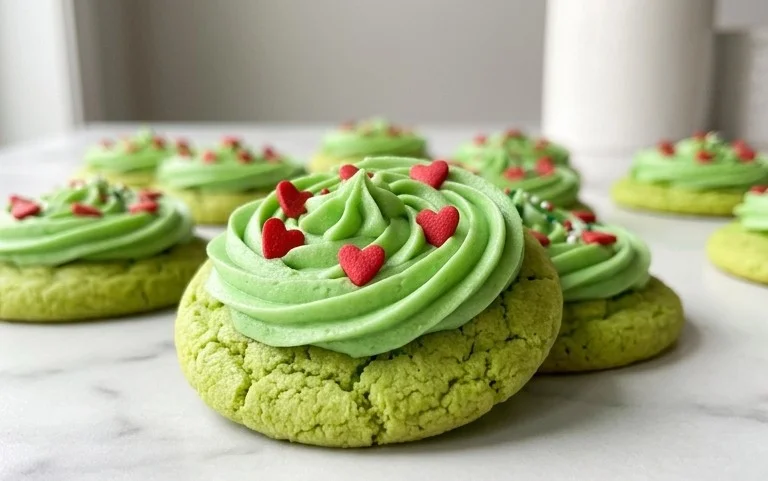
Get ready to bring a little bit of Whoville to your kitchen this holiday season with these absolutely delightful Grinch Sugar Cookies! They’re not just cookies; they’re a vibrant splash of green joy, perfectly chewy in the center with slightly crisp edges, and topped with a charming red heart to capture the essence of everyone’s favorite grumpy-turned-giving character. These cookies are surprisingly simple to make, making them a fantastic activity for family fun or a guaranteed hit at any holiday gathering. Forget the store-bought treats; the magic of homemade is truly unmatched, especially when it comes to something as iconic and lovable as the Grinch. The best part? You don’t need any special skills – just a love for delicious cookies and a festive spirit!
Ingredients:
- 1 stick (4 ounces/ 8 tablespoons) unsalted butter, softened
- 2/3 cup granulated sugar, plus extra for rolling
- 2 large egg yolks (make sure to save those whites for another recipe!)
- 1 teaspoon vanilla extract
- 3-5 drops green food gel coloring (gel is key for vibrant color without altering the dough consistency)
- 1 1/4 cup all-purpose flour
- 1/2 teaspoon baking soda
- 1/4 teaspoon fine salt
- 12 red heart sprinkles
Crafting Your Grinchy Dough
The journey to perfect Grinch Sugar Cookies begins with creaming together your softened butter and sugar. This is a crucial step for achieving that wonderful cookie texture. Make sure your butter is truly softened – not melted! You should be able to press into it easily with your finger. Cream them together in a medium-sized bowl using an electric mixer (or a sturdy whisk and some elbow grease) until the mixture is light and fluffy. This process incorporates air into the dough, which contributes to the cookies’ tender crumb and helps them spread just the right amount.
Next, it’s time to add our egg yolks and vanilla extract. Remember, we’re only using the yolks here, which helps create a richer, chewier cookie. Beat them in until thoroughly combined. Now for the fun part: the color! Add your green food gel coloring, starting with 3 drops. Mix it well, and if you desire a more intense Grinch-green hue, add another drop or two until you reach your perfect shade. Gel coloring is preferred over liquid as it’s more concentrated and won’t add excess moisture to the dough, which can lead to spread-out, flat cookies.
In a separate bowl, whisk together your all-purpose flour, baking soda, and fine salt. This ensures that the leavening agent and salt are evenly distributed throughout the dry ingredients, preventing any pockets of bitterness or uneven rising. Gradually add the dry ingredients to the wet ingredients, mixing on low speed or by hand until just combined. Be careful not to overmix at this stage. Overmixing can develop the gluten in the flour too much, resulting in tough cookies. We want tender, melt-in-your-mouth goodness! The dough should be soft but hold together.
Shaping and Baking Your Grinch-tastic Creations
Once your dough is ready, it’s time to chill it. This is another essential step for sugar cookies. Wrap the dough tightly in plastic wrap and refrigerate for at least 30 minutes, or up to 2 days. Chilling the dough makes it firmer and easier to handle, preventing excessive spreading during baking and ensuring your cookies hold their shape beautifully.
Preheat your oven to 350°F (175°C). Line baking sheets with parchment paper. This prevents sticking and makes for easy cleanup. Now, take your chilled dough and roll it into small balls, about 1-inch in diameter. You can also flatten them slightly if you prefer a thinner cookie. Place the dough balls onto your prepared baking sheets, leaving about 2 inches of space between them to allow for expansion.
For that extra touch of magic and to achieve the perfect texture, we’re going to roll these balls in granulated sugar. This creates a delightful sweet crust on the outside of your cookies and adds a lovely sparkle. Gently roll each dough ball in a small bowl filled with granulated sugar until evenly coated. Place the sugared dough balls back onto the baking sheets.
Now, for the iconic Grinch touch. Carefully press one red heart sprinkle into the center of each cookie. This little detail makes all the difference and instantly transforms your green cookies into recognizable Grinch characters.
Bake for 10-12 minutes, or until the edges are lightly golden brown and the centers are set but still look slightly soft. They will continue to bake a little on the hot baking sheet after you remove them from the oven. The exact baking time will depend on your oven and the size of your cookies. Keep a close eye on them to prevent overbaking.
Once baked, let the cookies cool on the baking sheets for 5 minutes before transferring them to a wire rack to cool completely. This resting period on the baking sheet allows them to firm up properly. Once cooled, your Grinch Sugar Cookies are ready to be devoured! They’re perfect for sharing, gifting, or simply enjoying with a glass of milk. Happy baking, and may your hearts grow three sizes today!

Conclusion:
And there you have it – your guide to creating the most delightfully Grinch-green sugar cookies! This recipe is truly a winner because it delivers on both flavor and festive fun. The cookies themselves are perfectly crisp on the edges with a soft, chewy center, and the vibrant green hue is guaranteed to bring a smile to anyone’s face, just like the Grinch himself. They’re incredibly versatile, making them ideal for holiday parties, classroom treats, or simply a cozy afternoon baking session.
For serving, these Grinch sugar cookies are fantastic on their own, but they truly shine when paired with a tall glass of milk. You can also get creative with decorations! Consider adding a little red frosting to resemble a Grinch heart, or sprinkle them with festive edible glitter for extra sparkle. For variations, don’t be afraid to experiment with adding a hint of lime zest to the dough for a subtle citrus twist, or swap out some of the all-purpose flour for almond flour for a nuttier flavor profile. I wholeheartedly encourage you to give this Grinch sugar cookie recipe a try – it’s a simple yet incredibly rewarding way to spread some holiday cheer.
Frequently Asked Questions about Grinch Sugar Cookies:
How do I achieve the perfect Grinch-green color?
To get that iconic Grinch green, you’ll want to use a good quality green food coloring. Gel food coloring is often best as it’s more concentrated and you’ll need less of it. Start with a few drops and gradually add more until you achieve your desired shade. Remember, the color can sometimes deepen slightly as the dough chills.
Can I freeze the cookie dough?
Absolutely! This Grinch sugar cookie dough freezes wonderfully. Once you’ve mixed the dough, wrap it tightly in plastic wrap and then place it in a freezer-safe bag or container. It should keep well for up to 2-3 months. Thaw the dough overnight in the refrigerator before proceeding with baking.
What if I don’t have cookie cutters?
No worries! You can still make fun Grinch cookies without specific cutters. Roll out the dough and use a round cookie cutter for simple discs. Or, you can simply shape them by hand into little mounds or any fun, festive shape you can imagine. The flavor is what truly matters!
Grinch Sugar Cookies
Festive and fun Grinch-themed sugar cookies with a vibrant green hue and sweet, buttery flavor. Perfect for holiday baking and celebrations.
Ingredients
-
1 stick (4 ounces/ 8 tablespoons) unsalted butter, softened
-
2/3 cup granulated sugar, plus extra for rolling
-
2 large egg yolks
-
1 teaspoon vanilla extract
-
3-5 drops green food gel coloring
-
1 1/4 cup all-purpose flour
-
1/2 teaspoon baking soda
-
1/4 teaspoon fine salt
-
12 red heart sprinkles
Instructions
-
Step 1
In a large bowl, cream together the softened butter and granulated sugar until light and fluffy. -
Step 2
Beat in the egg yolks and vanilla extract until well combined. -
Step 3
Add the green food gel coloring and mix until evenly distributed, creating a vibrant green dough. -
Step 4
In a separate bowl, whisk together the all-purpose flour, baking soda, and salt. Gradually add the dry ingredients to the wet ingredients, mixing until just combined. Do not overmix. -
Step 5
Chill the dough in the refrigerator for at least 30 minutes. This will make it easier to roll and cut. -
Step 6
Preheat your oven to 350°F (175°C). Line baking sheets with parchment paper. -
Step 7
On a lightly floured surface, roll out the dough to about 1/4-inch thickness. Cut out desired Grinch-themed shapes or simple circles. If using circles, you can press a heart sprinkle onto each before baking. -
Step 8
Place cookies on the prepared baking sheets, about 1 inch apart. Roll any scraps and re-roll dough as needed. -
Step 9
Bake for 8-10 minutes, or until the edges are lightly golden. Let cookies cool on the baking sheets for a few minutes before transferring them to a wire rack to cool completely.
Important Information
Nutrition Facts (Per Serving)
It is important to consider this information as approximate and not to use it as definitive health advice.
Allergy Information
Please check ingredients for potential allergens and consult a health professional if in doubt.