No Bake Peanut Butter Granola Cups Easy Treat
No Bake Peanut Butter Granola Cups are the ultimate solution for those moments when a craving strikes but the oven feels miles away. Let’s be honest, who *doesn’t* adore the irresistible combination of creamy peanut butter and crunchy granola, all molded into perfectly portioned cups? These little delights are more than just a snack; they’re a mini celebration in every bite. What makes these no bake peanut butter granola cups so incredibly special is their effortless simplicity. You can whip up a batch in mere minutes, requiring no baking skills whatsoever. They’re ideal for busy afternoons, quick breakfasts, or even a guilt-free dessert. The satisfying chew of the granola paired with the rich, nutty embrace of peanut butter creates a flavor profile that’s both comforting and addictive. Get ready to discover your new favorite sweet treat!
No Bake Peanut Butter Granola Cups
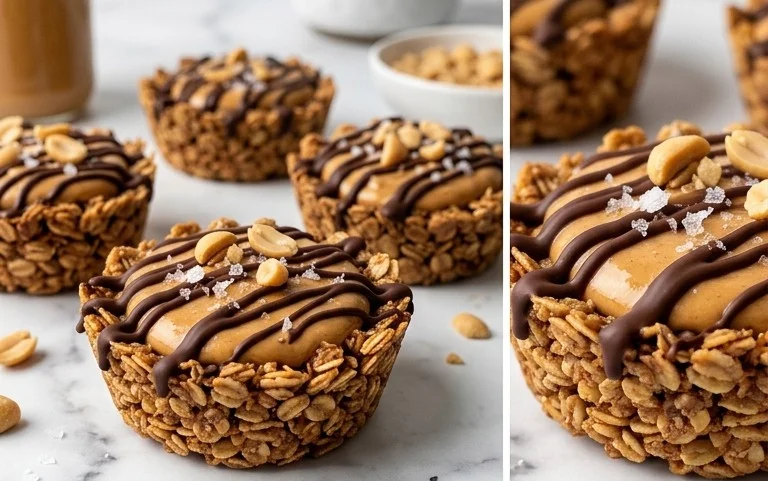
Get ready for a treat that’s ridiculously easy to make and unbelievably delicious! These No Bake Peanut Butter Granola Cups are my absolute go-to when I need a quick energy boost or a satisfying sweet fix. They combine the satisfying crunch of granola, the rich flavor of peanut butter, and the decadent melt of dark chocolate into perfect little cups of joy. The best part? No oven required! You can whip these up in under 30 minutes, and then it’s just a matter of waiting for them to set in the fridge. They’re a fantastic option for a healthy-ish snack, a party dessert, or even a little something special to pack in lunchboxes. I love how customizable they are too – feel free to experiment with different types of granola or add-ins!
Ingredients:
- 2 ½ cups granola
- 1 cup peanuts-chopped
- 3 Tablespoons peanut butter (creamy or crunchy, your preference!)
- 3 Tablespoons honey (or more if needed for consistency)
- 1 cup peanut butter-melted
- Topping:
- 12 oz. dark chocolate-finally chopped
- 1 Tablespoon coconut oil
Let’s Get This No-Bake Party Started!
The beauty of these granola cups is their simplicity. We’re essentially creating a flavorful, crunchy base and then topping it with a luscious chocolate shell. It’s a foolproof recipe that even the most novice baker can master. Grab your favorite mixing bowls and let’s dive in!
First things first, we need to prepare our delicious, crunchy base. In a large mixing bowl, combine your 2 ½ cups of granola with the 1 cup of chopped peanuts. This is where you can really personalize your cups. If you love a strong peanut flavor, feel free to chop your peanuts a little finer. If you enjoy a more pronounced nutty crunch, keep them chunkier. Next, add in the 3 tablespoons of peanut butter. This acts as a binder, helping to hold all those delicious ingredients together. I usually opt for a creamy peanut butter here, but if you’re a fan of extra texture, crunchy peanut butter will work wonderfully.
Now, for the sweetness and stickiness! Drizzle in the 3 tablespoons of honey. Honey is my preferred sweetener here because it adds a lovely floral note and a nice gooey texture. If your granola is already quite sweet, you might find that 3 tablespoons is perfect. However, if you prefer a sweeter base or if your ingredients feel a bit dry and not quite sticking together, don’t hesitate to add another tablespoon or two of honey. You’re looking for a consistency where the mixture just starts to clump together when you squeeze it in your hand. It shouldn’t be wet or sticky, but it should hold its shape. Gently mix everything together until it’s well combined, ensuring the peanut butter and honey are evenly distributed throughout the granola and peanut mixture. You want every bite to have that perfect balance of flavors and textures.
Once your base mixture is ready, it’s time to form the cups. I highly recommend using a standard muffin tin for this. You can either line it with paper cupcake liners, or, for an even easier cleanup, you can lightly grease the muffin tin itself. The liners can sometimes be a bit tricky to peel off once the cups are set, so greasing is my preferred method. Take about 2 to 3 tablespoons of the granola mixture and press it firmly into the bottom of each muffin cup. You’re aiming to create a compact, even layer that will serve as the sturdy base for our chocolate topping. Really press down to ensure it’s well-compacted, otherwise, your cups might crumble when you try to take them out. I like to use the back of a spoon or my fingers to really flatten and smooth the surface. This process creates a delightful, chewy base that complements the smooth chocolate perfectly.
Now comes the magical transformation for the peanut butter layer! Take your 1 cup of peanut butter and gently melt it. You can do this in the microwave in 30-second intervals, stirring in between, until it’s smooth and pourable. Alternatively, you can melt it in a small saucepan over low heat, stirring constantly to prevent it from burning. Once melted, spoon about 1 to 2 tablespoons of the melted peanut butter over the granola base in each muffin cup. Spread it evenly to cover the entire surface. This layer adds an extra punch of peanut butter goodness and creates a lovely smooth layer between the crunchy base and the chocolate topping. It’s like a little surprise waiting in the middle!
Finally, it’s time for the glorious chocolate topping! In a separate, heatproof bowl, combine your 12 oz. of finely chopped dark chocolate with the 1 tablespoon of coconut oil. The coconut oil is key here; it helps the chocolate melt smoothly and gives it that beautiful glossy finish. Melt the chocolate and coconut oil together, either in the microwave in short bursts (stirring frequently!) or over a double boiler. Be patient with this step; you don’t want to scorch your chocolate. Once the chocolate is completely melted and smooth, carefully spoon it over the peanut butter layer in each muffin cup, ensuring it covers the peanut butter completely. You can gently tap the muffin tin on the counter a few times to help the chocolate settle and remove any air bubbles. This creates a perfect, even chocolate shell that encases all that deliciousness inside.
Setting the Stage for Sweet Success
Once all your cups are assembled, it’s time to let them work their magic. Carefully place the muffin tin into the refrigerator. You’ll want to let them chill for at least 1 hour, or until the chocolate is completely firm and set. The longer they chill, the easier they will be to remove from the tin. For an even firmer set, you can pop them in the freezer for about 20-30 minutes before transferring them to the fridge. Once set, gently remove the granola cups from the muffin tin. If you used liners, peeling them off is usually straightforward. If you greased the tin, they should pop out with ease. You can store these delicious treats in an airtight container in the refrigerator for up to a week. They are best enjoyed chilled, when that chocolate shell is firm and the inside is perfectly chewy. Enjoy your homemade, no-bake sensation!

Conclusion:
And there you have it! Our No Bake Peanut Butter Granola Cups are officially ready to grace your kitchen with their delicious simplicity. These little bites are an absolute winner for so many reasons. They’re incredibly easy to make, requiring no oven time whatsoever, making them perfect for a quick sweet treat or an impressive-looking (but secretly effortless) dessert. The delightful combination of creamy peanut butter and crunchy granola is a classic for a reason, and the fact that you can whip these up in just minutes is truly the icing on the cake. These are fantastic for a mid-afternoon energy boost, a satisfying after-dinner indulgence, or even as part of a brunch spread. I love serving them chilled straight from the fridge, but they’re also wonderful at room temperature.
Don’t be afraid to get creative with your own unique variations! You could try adding a swirl of melted chocolate on top, a sprinkle of sea salt for that sweet and salty contrast, or even incorporate some mini chocolate chips directly into the granola mixture. If you’re feeling adventurous, perhaps a drizzle of honey or a sprinkle of chopped nuts could elevate your No Bake Peanut Butter Granola Cups even further. I truly encourage you to give this recipe a try. It’s a foolproof way to satisfy your sweet cravings and impress yourself (and anyone lucky enough to share with you!).
Frequently Asked Questions:
Can I make these peanut butter granola cups ahead of time?
Absolutely! These are fantastic for making ahead. In fact, they’re best when they’ve had a little time to firm up in the refrigerator. You can store them in an airtight container in the fridge for up to a week.
What if I have a peanut allergy?
No problem! You can easily substitute the peanut butter with another nut or seed butter. Almond butter, cashew butter, or sunflower seed butter all work wonderfully and will give your No Bake Peanut Butter Granola Cups a slightly different but equally delicious flavor profile.
Can I make these cups vegan?
Yes, you certainly can! Ensure your granola is vegan, and if you’re using honey, swap it for maple syrup or agave nectar. This recipe is very adaptable to different dietary needs.
No Bake Peanut Butter Granola Cups
Easy no-bake granola cups with peanut butter and dark chocolate, perfect for a quick treat.
Ingredients
-
2 ½ cups granola
-
1 cup peanuts-chopped
-
3 Tablespoons peanut butter
-
3 Tablespoons honey
-
1 cup peanut butter-melted
-
12 oz. dark chocolate-finally chopped
-
1 Tablespoon coconut oil
Instructions
-
Step 1
Line a muffin tin with paper liners. -
Step 2
In a bowl, combine granola, chopped peanuts, peanut butter, and honey. Mix until well combined, adding more honey if needed to help it stick together. -
Step 3
Press about 1-2 tablespoons of the granola mixture into the bottom of each muffin liner. -
Step 4
In a separate bowl, melt the cup of peanut butter. -
Step 5
Pour about 1 tablespoon of melted peanut butter over the granola base in each cup. -
Step 6
Melt the dark chocolate with coconut oil, stirring until smooth. -
Step 7
Spoon the chocolate mixture over the peanut butter layer in each cup, covering it completely. -
Step 8
Chill in the refrigerator for at least 30 minutes, or until firm.
Important Information
Nutrition Facts (Per Serving)
It is important to consider this information as approximate and not to use it as definitive health advice.
Allergy Information
Please check ingredients for potential allergens and consult a health professional if in doubt.